
Containers
Seeds can be sown in a seed-tray or half-tray with partitions formed by the labels or other strips of plastic such as old credit cards cut into strips (Fig. 1). Another method is to sow in small pots, one species to a pot, since there is less likelihood of the seeds ‘jumping’ from their own compartment, though small pots do tend to dry out much quicker than trays. It is a good plan to stand the containers on a tray of damp sand, so that they do not dry out from below. A plastic sandwich box is good for this purpose.
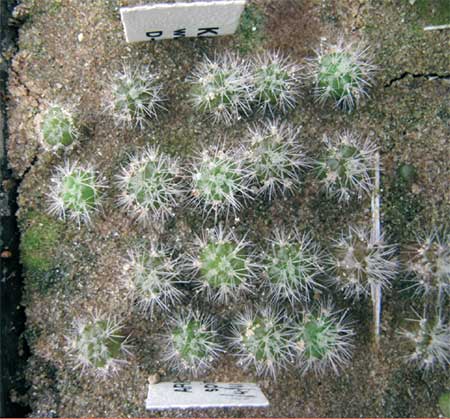
Fig 1, 8-week old seedlings
Composts
Whichever compost is chosen, it should be light and well aerated. John Innes (JI) Seed Compost, with the addition of ½ gritty sand is an old favourite, but many people use the modern no-soil composts with good results. With these, it is imperative not to firm the mixture down. Make sure to use fresh, clean and almost dry ingredients and if possible new bags of sterilised compost.
Sowing the seed
The best time to sow is in spring, from late March to mid-May (or as early as February in a heated propagator). Stand the pots or trays in a water-tray till they have soaked up the moisture and the compost surface is all moist. Some growers use cool, boiled water and others use a fungicide in the water to inhibit the growth of algae and reduce seed rotting. Then drain the containers on old newspapers for a while. Label each pot or section of tray as you sow your seed using a plastic label written on with either a pencil or a waterproof pen that will not fade in sunlight. Make sure you transfer all the information from the seed packet including any habitat details. It is a good idea also to record your sowings in a book and allocate your own code to each sowing. In that way you can identify every sowing you make even where you have seed of the same species but from different sources or sown at different times. You can either scatter the seed in the usual way onto the top of the compost or sow individually, and push larger seeds down a little way. Sowing individually makes pricking out later on much easier as the roots do not get tangled and can be done, even for tiny seeds, using something like a watchmaker’s tiny screwdriver, touched onto the moist soil surface then touched onto the seed to pick it up and press it lightly into the compost (Fig. 2).

If scattered rather than individually pressed in, settle the seed into the soil by lightly spraying the pots or trays. It is often advantageous to sprinkle a very thin covering of silver sand over the surface immediately after sowing and let it moisten, so that the seeds have moist sand in contact with all the seed coat, but make sure only just to cover the seeds. Then cover the pots or trays with clear plastic covers or enclose them in polythene bags sealed with a freezer-tie, or use resealable plastic bags. Tall labels or something similar can be used to prevent the polythene falling onto the compost surface (Fig. 3). Then arrange the pots or trays in whatever container you have chosen, and place them in a warm, bright place near a window. Strong sunlight around the middle of the day should be filtered by placing extra polythene or a sheet of thin white paper to prevent it shining directly on the soil surface. When a sufficient number have germinated and are clear of the soil surface, you can sprinkle fine sand (such as silver sand or fine grit) over the surface, taking care not to bury the seedlings, to reduce the growth of algae and mosses.

Propagators
If possible, germinate the seed in a propagator with bottom heat, preferably thermostatically controlled (Fig. 4), though a warm bright windowsill will give good results, especially if you wait till April to sow. The majority of seeds germinate best at a daytime temperature between 18° and 24°C, (65° and 75°F), and some seedlings may appear within a week or 10 days. At lower temperatures, germination usually takes considerably longer. Failing a propagator, many people make use of any other suitable warm bright place in the house. If possible, let the temperature drop a little at nights down to no lower than 16°C (60°F) as this daily variation sometimes spurs seedlings to germinate.

Germination and after
Be careful to keep the top of the compost damp. When the pots show signs of becoming dry, stand them in water again till the soil surface is damp and drain as before. Make sure that any sand in the tray remains damp. From now on, the tiny seedlings need to be in a good light, but shading from all but winter sun is desirable for the first 12 months. If the young plants are exposed to too much sun, or the compost dries out, they may stop growing and often turn red. Once they stop, it is often difficult to persuade them to start growing again. If they go deeper red or purple, introduce more shading. The ideal colour is deep green, perhaps with a reddish tinge (Fig. 5). After germination and at intervals of about 10 days, it is as well to spray with a fungicide. It is as well to continue this treatment for 8–10 weeks, or until the seedlings look like miniature cacti. Never let the pots dry out, but do not saturate them either. A sodden compost is as harmful as a dry one. Try to keep the atmosphere in a propagating box damp as this helps to ensure that roots do not dry out before they have penetrated to a reasonable depth in the compost. You can start ventilating the seedlings gradually from around August onwards, or earlier if they start to get leggy or pale green. Some faster-growing seedlings, including many succulents such as Lithops, need ventilating earlier, perhaps 2–3 months after sowing.
Pricking out
This can be done “when the seedlings are large enough to handle” – as the books say; otherwise, when they are overcrowded, or if the soil looks sour. It is best to leave the seedlings as long as possible before pricking out, leaving them even for more than a year for small ones, as tiny seedlings have delicate root systems which can easily be broken when transplanting (Fig. 6). Any good compost mix will do at this stage, provided it is well drained and well aerated. Above all, keep the seedlings growing. Leave the pricked out seedlings dry for one to two weeks after pricking out, though light spraying occasionally during this period may be beneficial for very small seedlings in hot, dry weather.

Winter care of seedlings
Ideally, your seedlings should be kept at a minimum of 16°C (60°F) during their first winter, in which case they may be carefully watered and kept growing. However, some experienced growers give their seedlings little or no extra heat during the winter, and keep them dry like the rest of the plants. If you do water lightly on warmer days, try to ensure that the compost is nearly dry by nightfall. The most dangerous months for your seedlings are likely to be February, March and early April, when the nights are cold and the day temperatures under glass rather high. As the days lengthen, the seedlings really respond to watering and start to grow visibly, and it is then that a sharp drop in temperature can be fatal if the compost is too wet. By mid-April, one can usually give the normal summer treatment.
Pests
The most dangerous insect pests for young seedlings are Sciarid or mushroom flies, which lay their eggs in damp compost and seem to be attracted to compost containing peat or leaf-mould. The grubs which hatch out seem particularly partial to small seedlings and will either eat the entire plant or leave nothing but an empty shell. The flies are small and black and hover or walk over the compost. Covering the compost surface thinly with a light coloured material like silver sand often inhibits sciarid flies from laying their eggs in the compost. They can be dealt with at the grub stage by spraying the seed-pan with a systemic insecticide, which may also kill some adults. This appears to be harmless to the seedlings. The risk of sciarid attack continues for as long as the seedlings are kept damp, though it seems unlikely that the grubs will attack a well-grown 18-month-old seedling. Watch out for sciarid flies right from the time when you sow, and do not leave any pots uncovered at any time when you are not actually there sowing, inspecting or watering. Make sure that the transparent covers over your seed pots have no holes or gaps where sciarid flies could enter. Small slugs are another potential cause of considerable losses, though these can usually be seen without difficulty and precautions are straightforward. More on pests.
Note – Epiphyllums from seed
These plants dislike lime in their compost, so composts based on the JI compost formulations are unsuitable for them. A finer peat-based compost, with added gritty sand, is ideal both for sowing the seed and for growing the plants on afterwards, but cover the surface with fine grit as soon as they have germinated to keep down mosses and algae.
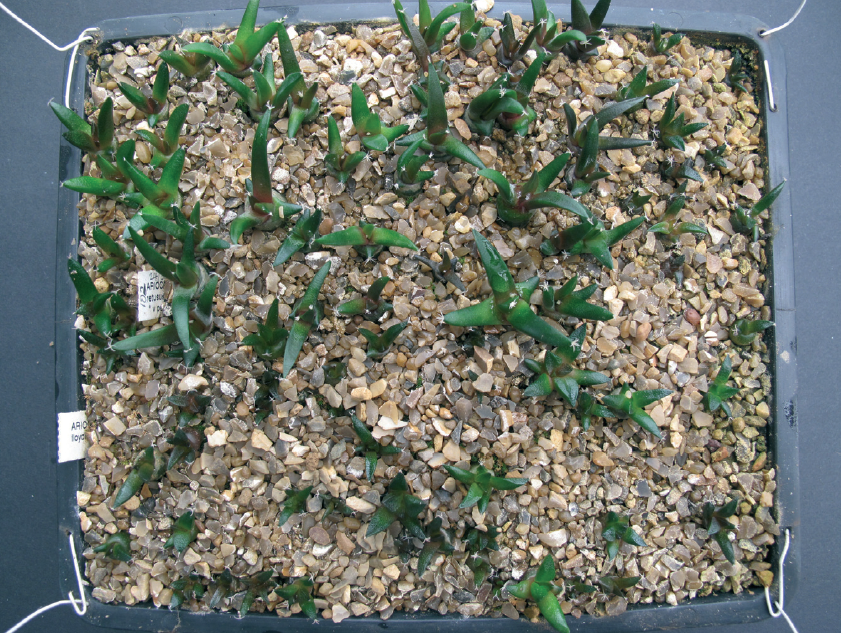
Other succulents
Most of the other succulents can be grown from seed in a comparable way but they often like slightly lower temperatures and earlier ventilation (Figs. 7 and 8). Seedlings of stapeliads are very large, even when very young, so make sure they have sufficient head-room if they are to remain covered.


General
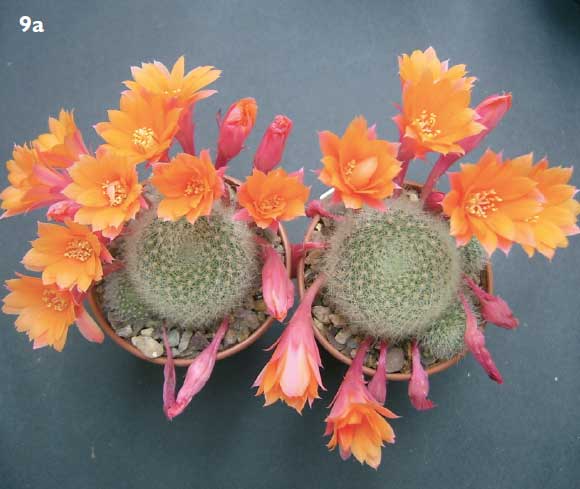
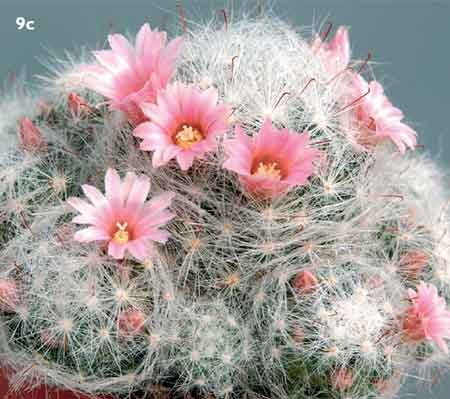
Some species of cacti, especially of Mammillaria and Rebutia, will flower at two years old from seed, sometimes sooner, and are especially easy to raise in many cases (Figs. 9a–d). Most of the taller growing cacti, species of Cereus and Cleistocactus, for example, have to reach a considerable size or age before they will flower, but these are frequently grown for their shape or spine colour.
Do not be disheartened by losses. Cacti are vulnerable at the seedling stage and plants may die for a variety of reasons. Remember that not all the seeds in a packet may be viable, while even if they germinate, not all the young plants may be capable of reaching maturity. One does not expect 100% germination or survival from packets of seeds of other plants. Practice makes perfect! Work out your own method, improving it a little each year and you will eventually achieve considerable success.
Sources of seed
General mixed seeds are offered by commercial seedsmen and some garden centres. Individually named seeds are usually obtained from specialist suppliers and nurseries, at home and abroad. A good source of addresses can be found among the adverts in the quarterly CactusWorld Journal of the BCSS. Another possibility is to do an internet search by keying in ‘cactus seeds’ or ‘succulent seeds’. The BCSS also offers its own extensive seed list annually to Members, at greatly reduced prices. CactusWorld also often contains ideas and techniques for seed raising.
Seed from your own plants usually germinates very well because it is fresh. Some plants produce seed without needing to be cross-pollinated by hand or by insects, and it can be collected once the seed pod is dry. However if flowers are cross-pollinated, they may not produce plants like the parent(s). You can pollinate your plants by transferring pollen from one plant to the stigma in the middle of the flower of another plant with an artist’s tiny paint brush or dampened matchstick.
Figs. 9a–d Cacti that flower when young and small:


A full set of cultivation leaflets are given free to new members and are available for sale in our shop.
Images: David Quail (All)